We’ve covered the installation of Windows Home Server 2011 and installing the Connector software on client computers and if you’ve followed along you are now ready to interact with the server from your client computers using the Dashboard. If you’re new to Windows Home Server 2011![]() now is a great time to jump on the bandwagon! Microsoft has dropped the price to around $60, which is practically unheard of.
now is a great time to jump on the bandwagon! Microsoft has dropped the price to around $60, which is practically unheard of.
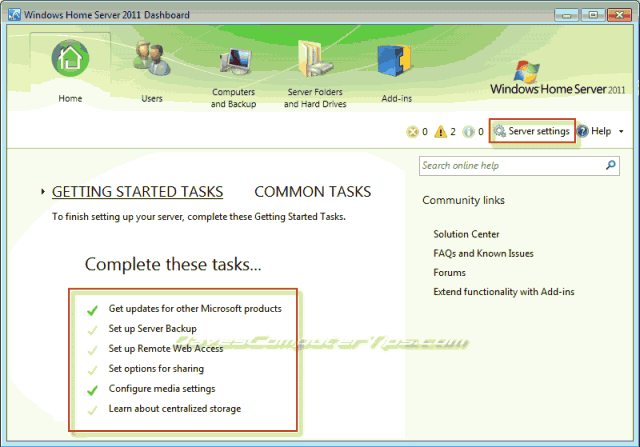
Windows Home Server 2011 Dashboard: Home tab
When you open the Dashboard for the first time you’ll see the screen below and notice that there are several tasks listed under Getting Started Tasks. This is where you’ll configure the basic settings for your home server.

Each task listed under Getting Started Tasks is a link making configuration extremely simple.
Get updates for other Microsoft Products
Start by clicking Get updates for other Microsoft products and you’ll be presented with the following screen.

Simply click Use Microsoft Update followed by OK to close the window. The dashboard should now show a green check mark to indicate that feature is configured.
Set up Server Backup on WHS 2011
If you plan on using an extra hard drive to backup the server, and I suggest you do so if possible, you can configure that by clicking Set up Server Backup, which will allow you to backup the server to an internal or external hard drive automatically on a set schedule. If you choose to configure this now you will see the following screen.

Simply click Next to begin.
You will be presented with a screen allowing you to choose which drive you would like to use as the backup. In this instance the server is running in a virtual machine and the drive is a virtual disk, so the nomenclature may seem a little weird. Yours would indicate “local disk”, a drive letter, or a number if the drive hasn’t been formatted yet. Check the drive you wish to use and click Next.

You will receive a warning notifying you that any data on the drive will be lost. This is because WHS 2011 will format the drive so that all space can be used to backup the chosen data on the server. Acknowledge the warning by clicking Yes.

Label the drive with a descriptive name so you’ll remember this is the backup drive later and click Next to proceed.

The next screen allows you to set the backup schedule. The left column sets a default of two backups per day that occur at 12pm and 11pm. You can change these to times of your liking. The right hand column allows more customization. You can choose the number of backups and their times by clicking one, or multiple, selections. I, myself, only backup once per day at midnight, which would be accomplished by clicking the custom button in the right hand column and checking the box for 12am. After you’ve made your decision click Next to proceed.

The following screen allows you to select what you would like backed up. Personally I backup everything except videos due to their large size. Depending on the size of the drive(s) you have available to dedicate to the backup task it may be necessary to limit the items included in your backups. If you have this need the important items to leave checked are Operating System and System Volume Information. Once you’ve made your choices click Next to proceed.

Finally you’ll be presented with a Summary screen. Pay careful attention to this screen and be sure it shows exactly what you want. If you’re sure click Apply settings.

The gears will whirl, the lights will flash, and in a few moments you’ll see that your backup was successfully been setup. Click Close to return to the Dashboard.

Notice the green check mark next to Set up Server Backup.

Set up Remote Web Access
Clicking Set up Remote Web Access link will open the following screen. Here is where you set up the ability to access your server remotely. Download, upload, stream and interact with the files and content on your server, as well as access computers on your network that support Remote Desktop Protocol. You’ll want to click on Turn on at the top.

Windows Home Server 2011 does a decent job automatically configuring routers that support UPnP, or Universal Plug and Play. Owners of routers of recent vintage should simply be able to click Next to allow the server to configure the router. Those with older routers will have to manually configure the router (manually forward several ports to the server) by placing a check into the box next to Skip router Setup before continuing.

Once the router is configured the next step is to create a domain name for your server. This is how you will access the server through a web browser from anywhere with an internet connection. If you chose chuckwagon.homeserver.com as your domain name you would simply type that into a web browser to access your server. Click Set up to start the process.

You will need a Windows Live ID for the next step. Enter your Windows Live ID User Name and Password and click Next.

Once your Live ID is verified you’ll be asked to choose a domain. Enter something descriptive that you’ll remember in the first box and choose an option from the dropdown. An example would be if your family name is Chuckwagon you could use chuckwagon.homeserver.com. Click the Check availability button to see if your choice is in use and directly under the button you will be told if it is, or if it isn’t. If it is available click Set up to allow a domain to be created for you.

Once the domain is created you have to option of trying it out or closing the wizard and returning to the Remote Access screen. Click Close to return to the Remote Access screen.

You can make some very basic changes to the Remote Access web page. They should be pretty self explainatory, so I won’t cover them here. You can access the settings by clicking the Customize button under Web site settings in the Remote Access window. Click OK to close the Remote Access window and return to the Dashboard to continue setup.
Set options for sharing
Back at the Dashboard click Set options for sharing to configure sharing options for content located on the server. There are three options to choose from and I suggest you choose Share with user accounts as it will provide you with more overall control. Share with user accounts should be selected by default, and if so you can click Close to return to the Dashboard.

Configure media settings
One of the fundamental uses of a server is to share media with other devices whether they be computers or media extenders, such at the xbox. Configuring media sharing on Windows Home Server is a snap and it’s the next thing on our list! Click the Configure media settings link on the Dashboard home tab and you’ll see the following screen.

The first thing you want to do is click the Turn on button under Media server is: off. This will enable media sharing to computers and devices.
The second thing you should do is select a setting under Video streaming quality. This determines the quality of video that is available when streaming video through the remote access website. You should consider the speed and quality of your internet connection when determining whether you select Low, Medium, High, or Best. The higher the quality the more bandwidth will be required, and selecting a setting that is too high will result in stuttering video. Don’t be afraid to experiment with this, as you can always change it later.
The third setting allows you to control, on a global scale, which shared folders are available in the media library.
Once you’ve made your choices click OK and you’ll be returned to the Dashboard home tab and find yourself rewarded with another green check mark.
Learn about centralized storage
The final task guides the user through a brief overview of centralized storage. Click the Learn about centralized storage link and following window will open.

Choosing an option will load a webpage with a brief, but easily explained, description of the basic principles used by the server and how to accomplish basic related tasks.
Well, there you have it. The Windows Home Server Dashboard home tab in a nutshell. You’re well on your way to becoming addicted to WHS 2011!
Hi Dave
Thanks so much for your post!! It is exactly what I was looking for!!
Happy New Year
Daniel