
Perhaps you’ve read or heard about how coding is the cool thing right now. Kids should be taught it in school; young ladies and gentlemen should be encouraged to get together and start software companies. Everyone should have a go, right? Including you, so read on.
What do you need to do to try coding, or programming, as it used to be known? You need a programming language which can convert your inspired coding thoughts into machine code that your PC can understand, and a civilised and helpful application to help you write those thoughts down.
Lots of nasty things are said about Java, which really apply mainly to its application in the web browser. The language itself is actually sophisticated, practical, and flexible, despite its reputation for web insecurity. It’s based on C++, widely regarded as the top programming language for development of fast and intricate applications. Java is designed to make it easy to construct object-oriented applications, in which the data and the functions, or methods, that manipulate the data are organised in a way that reflects a model of the real-life task to be done, rather than just a plodding series of one calculation after another.
Web applications are actually the least of Java’s many uses; many corporate businesses use it for advanced application programming, data and web server applications, where its structures make for efficient and reusable code. That code will work on almost any operating system, thanks to the Java Runtime Environment (JRE) or Java Virtual Machine (JVM) which you get when you install Java on your system. Java runs on all sorts of computers, from the very large to the very small. There is a good chance that it’s running on some piece of electronic equipment you use every day.
A lot of books on coding begin by getting you to write a first program which displays on the screen the immortal words “Hello World!”. That is so last-century. We’re going to produce something a little more spectacular. To do it, we’re going to plunge straight in with an advanced developer’s tool, NetBeans. Don’t worry, you can handle this. We’re only going to be using a very small part of its immense capabilities, it’s easy to get going and start with, and it’ll look really impressive when you demonstrate programs to your nearest and dearest (look what I just hacked together, darling!).
![]() First you need Java. You may already have it installed in the form of the JRE, which has the plugin modules for use by web browsers. Now you need the full monty – the Java Developer’s Kit, or JDK. Go to http://www.oracle.com/technetwork/java/javase/downloads/index.html and select JDK Download. The current version at the time of writing is 1.8.0_05. Select the radio button to accept the Licence Agreement (you could even read it if you’re feeling particularly masochistic), and download the appropriate JDK for your system, 32-bit or 64-bit (find out which by opening Control Panel | System, and looking at System Type). Double-click on the file to install it, and just click through until it’s done.
First you need Java. You may already have it installed in the form of the JRE, which has the plugin modules for use by web browsers. Now you need the full monty – the Java Developer’s Kit, or JDK. Go to http://www.oracle.com/technetwork/java/javase/downloads/index.html and select JDK Download. The current version at the time of writing is 1.8.0_05. Select the radio button to accept the Licence Agreement (you could even read it if you’re feeling particularly masochistic), and download the appropriate JDK for your system, 32-bit or 64-bit (find out which by opening Control Panel | System, and looking at System Type). Double-click on the file to install it, and just click through until it’s done.
 Now you need NetBeans. This is one of the most advanced and sophisticated software tools that you are ever likely to use, employed by developers world-wide, and it comes at an awesome price – free. Go to https://netbeans.org/, and select Download. You get to choose between several versions of varying capability, but we only need the first one, for Java SE (Standard Edition). It runs to about 90 MB. Download it and install it, leaving the installation selections at the defaults, except that you have to decide whether you want to install JUnit or not; it doesn’t matter what you select here. The installation should show you where it is going to put the NetBeans Project Folder, and where it has found the JDK. It will take a little while, so if I were you I would take five, or even ten.
When you come back, click OK, then find the NetBeans icon on your desktop and double-click. It may take some time for NetBeans to get itself organised, integrate with the JDK, and come up – be patient.
NetBeans will appear displaying its Start Page. Spend a moment admiring the scenery, then select “Try a Sample Project”. A project is the collection of files and resources that, taken together, comprise an application or suite of applications. The New Project dialog will come up; select “Samples” | “JavaFX”. I should explain that JavaFX is a collection of software graphics libraries that enables you to produce attractive and dynamic coloured graphics applications with relative ease. It is included in the JDK. From the samples, select ColorfulCircles, then select Next to construct the project, noting that NetBeans creates a ColorfulCircles project folder in Documents\\NetBeansProjects. Press Finish. NetBeans now opens the new project and carefully scans through it to check that the code is OK. This will take a little while; keep an eye on the progress bar at the bottom right.

At the end of this process, NetBeans will have set up the project files for you, and they will be displayed in the Projects pane at the top left. Click repeatedly on the + symbols until you see ColorfulCircles.java. This is the coded program itself. To have a look at it, double-click it, and look at the tabbed window that opens on the right. Scroll through the program. Note its characteristics. It’s nice and neat and orderly. There are comments dotted through it to give some indication of what it does. And note particularly that it’s not very long, which might surprise you when you see what it does.
Now press the Build button in the toolbar (blue hammer). NetBeans will start to build (compile and link) the program with the necessary support libraries from those outlined in the left pane. This shouldn’t take long; the progress bar at the bottom right will indicate when the build has finished.
The moment of truth has come. Press the Run button in the toolbar (big green right-pointing arrow). A series of unintelligible lines will appear in the Output window, amongst which may be some warnings (ignore them) and eventually an Execute line in red. You are running your first Java program. Suddenly a wondrous window of many colours should open before your very eyes. Cool, no? Well, I think so. Better than “Hello World” at any rate.
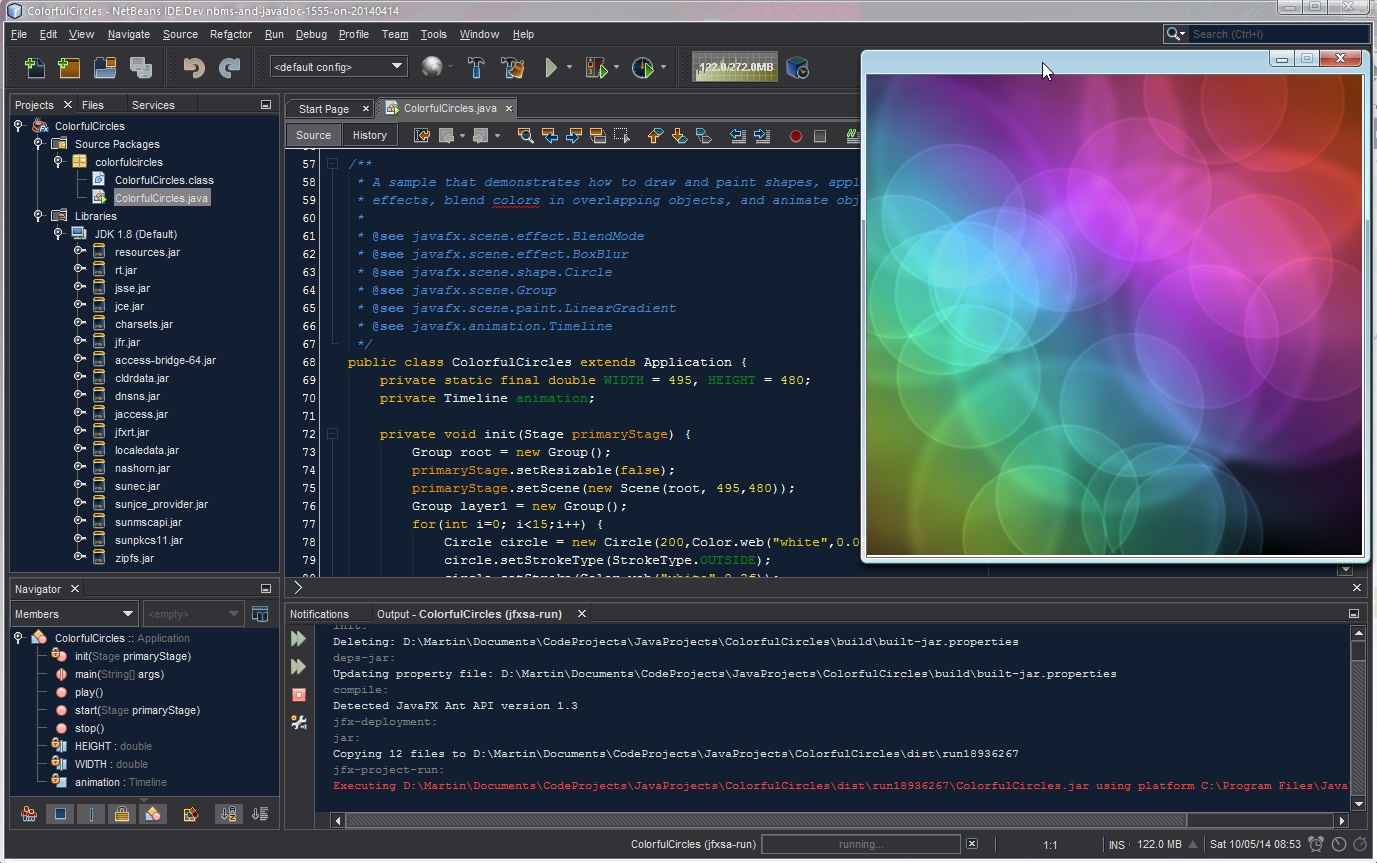
Note that you can change NetBeans’ colour scheme in Tools | Options | Appearance, on the Look & Feel tab. The above is Dark Metal, which I find more restful on the eyes than the default, but to get it I had to install the “Dark Look & Feel Themes” plugin, using Tools | Plugins | Available Plugins. It sets the “Norway Today” pane theme – see Tools | Options | Fonts & Colors | Profile.
When you have finished being stunned by your achievement, you may feel that you would like to produce something a little more interactive. A game perhaps? Close the coloured window, and then close the project by highlighting the project name at the top of the left pane, right-clicking and selecting Close from the context menu. You should be back at the Start Page, but you will need to select the “Learn & Discover” tab. Select “Try a Sample Project” and JavaFX as before, but this time select BrickBreaker from the project menu. Create a project for BrickBreaker as you did for ColorfulCircles.
Again, NetBeans may take its time opening and checking the new project. Have a look at the project files, by selecting the + icons until the files appear. Double-click on the code files to see them in the right tabbed pane. Note that there are more .java files this time, plus a lot of resource files in the form of images (e.g. ready.png). You will see what these look like in a minute. Note also that the Java files are not particularly long, which again might surprise you when you see the complexity of the program. When NetBeans has finished its fussy checking, press the Build button again. More mysterious lines should be output in the build windows, again some warnings, nothing to worry about (I hope). Now press the Run arrow, and cross your fingers, hold your breath, or both. Behold BrickBreaker!

Click on the BrickBreaker window to start things off, and move your mouse left and right to control the bat. I’m sure you’ll work out the rest. See how you get on. How well the game runs is dependent to some extent on your graphics card, but it should be pretty smooth. Java is surprisingly fast for a language whose compiled bytecode still has to be interpreted for the computer by the JVM before it will run.
Still want to see “Hello World”? All right then, if you must. Close BrickBreaker and the BrickBreaker project, and create a new project (File | New Project, and select Java). Call it – er – HelloWorld. Leave the defaults set, and press Finish. NetBeans will create a new Java file for you, HelloWorld.java. Just modify the code already set up for you; this is all you need:
//      Filename: HelloWorld.java
//      Author: A N Other
//      Date: 10 May 2014

package helloworld;
import javax.swing.JOptionPane;

public class HelloWorld
{
    public static void main(String[] args)
    {
        JOptionPane.showMessageDialog(null, "Hello World!");
        System.exit(0);
    }
}
The semi-colons, braces, and dots are important; the code must be exactly as shown, except that spaces and tabs can be used to modify the layout. You could just copy and paste the whole thing into the Hello.java pane , provided you finish up with the above code. Save the file: File | Save.

Select the Build button, wait until the Output window says BUILD SUCCESSFUL, then press the Run button. Happy now? Click OK to finish.
I started on Java with a remaindered copy of “Java Programming” by Joyce Farrell (Thomson Course Technology), which starts at an elementary level, and is both comprehensive and easy to understand, but there are lots of free online resources that will help you, and of course books like “Java for Dummies”. Particularly useful are the tutorials produced by the NetBeans team (https://netbeans.org/kb/index.html), which range from the most elementary beginner’s level to the most advanced topics for developers. Similarly, there’s lots of Java help at http://docs.oracle.com/javase/tutorial/.
Finally, coding is not particularly hard, but it’s not particularly easy either. The most difficult and most important part is deciding what you actually want to create, and exactly what you want it to do and to look like. You have to do your design first, before you ever get down to writing actual code. Whether you want to write a simple game, or an application to record, analyse and present a project, or a physics program to simulate orbital motion under gravity, you still need to do the detailed design (ideally with outline sketches) and break it down into easy steps before you start coding.
Once you have worked out exactly what form your app should take, you can get down to making it actually happen. It’s daunting to see the amazing applications that other developers have created, but if you have the ideas, and put in the effort and concentration, you will be greatly rewarded by seeing your creation gradually emerge on your screen. The ultimate reward will come if someone else actually finds it useful and adopts it – then your career as a developer will have taken off!
Being mainly a modeller than a scriptor, I am more than pleased to see this tute.
I shall try my best to follow it and to follow on as well.
Something i’ve always thought about..just like cloning discs!..but never gotten around to.
I’ve used basic a fair bit when I had my Amiga 1000…still have that one too…And the Texas ti94 if I remember correctly.
But this language, if that’s the word, looks a lot more “deep” and may even be more fun.
Oh well, here I go.
Thanks for this, J. Martin Ward !
Colin
The tutorial at netbeans site is: https://netbeans.org/kb/articles/learn-java.html
After selecting the appropriate DL, I obtained a full screen warning that seemed very ominous:
“You should probably not proceed this is not the site you intended to use.”
The explanation was that the certificate was invalid. (my short version).
This is enough to stop anyone in their tracks – is it being suggested that we trust something from a site cannot manage its own certificates?
I think you should check this out & make mention in your above “how to” notes.